

When independent educators and coaches turn lecture notes into video using a scene-by-scene layout rather than a single unscripted webcam recording, they bridge the gap between personal teaching notes and a clear, self-paced student experience.
Instead of staring into a camera lens trying to remember every analogy, instructors map each teaching point onto a visual card with editable spoken narration that can be refined at any time.
Sponsored article prepared for Leadde.ai.
Anyone who has taught a workshop, coached clients, or led a seminar knows that the best teaching insights live in written lecture notes. Over years of practice, you refine outlines, analogies, step-by-step exercises, and answers to the questions students ask every single cohort.
Yet when you decide to turn those notes into a self-paced online course or a pre-session video library, the gap between a great set of notes and a finished video can feel unexpectedly wide.
Why Instructors Turn Lecture Notes into Video Instead of Recording Raw Webcam Talks
Many subject-matter experts stall out the moment they turn on a camera. Speaking into a lens without a live audience in the room changes your natural rhythm. You either read verbatim from a document and sound stiff, or you improvise from bullet points and realize twenty minutes later that you skipped a critical distinction.
Download this free 3-step guide and start building focus and inner calm in just 5 minutes a day.
**Get the Free Guide**
Instructional design guidelines from MIT Open Learning and adult learning studies from the Stanford Center for Teaching and Learning emphasize that self-paced learners rely on clear visual signposts and structured chunking to process unfamiliar ideas without cognitive overload.
Written lecture notes are designed as memory triggers for the speaker, not as a finished visual experience for a remote viewer. When instructors try to record a live video lecture straight from their teaching notes, three common friction points slow down production:
- Missing visual anchors for the viewer: In a live room, your gestures, whiteboard sketches, and eye contact keep students oriented while you talk through a five-minute concept. On a laptop screen, five minutes of a static talking head with no structured visual progression makes it hard for learners to follow the thread.
- All-or-nothing recording sessions: If you record a fifteen-minute lesson in one take and notice afterward that an explanation in minute nine was confusing, fixing it cleanly requires matching your lighting, microphone position, and vocal energy in a reshoot.
- Editing overload: Trimming long pauses, cutting out verbal stumbles, and manually syncing text callouts in a traditional video editor can easily consume four hours of post-production for every fifteen minutes of finished lesson time.
A Scene-Based Way to Turn Lecture Notes into Video Lessons
Instead of treating online teaching as a live camera performance, educators and course creators can turn lecture notes into teaching videos by organizing their written notes into scene-by-scene visual modules.
In a scene-based lecture workspace, each teaching point in your outline becomes an individual slide or visual card paired with its own spoken narration script and optional presenter view.
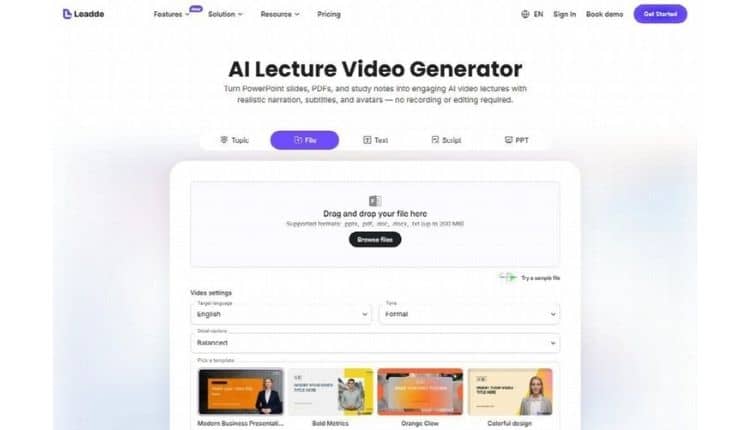
Mapping lecture outline points to visual slides and spoken narration inside the Leadde AI Lecture Video Maker.
| Teaching production step | Live camera and timeline editing | Scene-based lecture video workflow |
| Starting from written notes | Requires memorizing points or rigging a teleprompter | Import notes or outlines directly into structured lesson scenes |
| Visual clarity for learners | Viewers stare at a webcam frame or static document | Each teaching point gets a clean slide layout and key takeaways |
| Refining a tricky explanation | Re-shoot the segment and splice audio tracks | Edit the sentence in that scene’s script and re-render in minutes |
| Maintaining steady pacing | Easy to rush or ramble during a solo recording | Consistent 20-to-30-second scene timing keeps lessons focused |
Four Habits that Make Self-Paced Lecture Videos Easy to Follow
When learners watch a lesson on their own schedule, clarity and pacing matter far more than theatrical studio production. Structuring your lecture notes around four practical habits helps students stay engaged from the opening hook to the final exercise.
1. Organize every lesson around one core question
Before converting a folder of lecture notes into a video, look at the heading and rewrite it as a single concrete question the student cares about answering. Instead of titling a module “Foundations of Cognitive Framing and Habit Loops,” frame the lesson around “Why Do Good Habits Break Down During High-Stress Weeks?”
When a five-minute video is anchored to one clear question, deciding which notes belong in the script and which tangential stories should be saved for a bonus reading packet becomes effortless.
2. Use the “Concept, Analogy, Application” rhythm
In a classroom, you naturally alternate between theory and real-world examples. Build that same rhythm into your video scenes by grouping every major teaching point into a three-scene sequence:
- Scene A (The Concept): Introduce the core principle in forty to fifty words with a clean definition on screen.
- Scene B (The Everyday Analogy): Explain how the principle works using a familiar everyday comparison so the idea clicks intuitively.
- Scene C (The Practical Application): Give the learner one specific action, reflection prompt, or worksheet step they can try in the next ten minutes.
3. Keep on-screen text brief while narration carries the nuance
One of the fastest ways to tire out a viewer is putting full paragraphs of lecture notes on screen while reading those exact same words aloud. People read faster than you speak, which creates cognitive friction when slide text and voiceover compete for attention.
Keep the visual text on each lecture scene down to a clear headline and three short phrases of four to six words each. Put your rich storytelling, examples, and nuance into the spoken narration script so the visual card acts as a clean roadmap rather than a wall of text.
4. Close every video with a two-minute practice prompt
Learning sticks when viewers shift from watching to doing. Dedicate the final twenty seconds of every teaching video to a simple, self-contained exercise. Ask the student to pause the video, write down three observations in their workbook, or test the technique on a current project before clicking play on the next lesson.
Four Habits that Make Self-Paced Lecture Videos Easy to Follow
When learners watch a lesson on their own schedule, clarity and pacing matter far more than theatrical studio production. Structuring your lecture notes around four practical habits helps students stay engaged from the opening hook to the final exercise.
1. Organize every lesson around one core question
Before converting a folder of lecture notes into a video, look at the heading and rewrite it as a single concrete question the student cares about answering. Instead of titling a module “Foundations of Cognitive Framing and Habit Loops,” frame the lesson around “Why Do Good Habits Break Down During High-Stress Weeks?”
When a five-minute video is anchored to one clear question, deciding which notes belong in the script and which tangential stories should be saved for a bonus reading packet becomes effortless.
2. Use the “Concept, Analogy, Application” rhythm
In a classroom, you naturally alternate between theory and real-world examples. Build that same rhythm into your video scenes by grouping every major teaching point into a three-scene sequence:
- Scene A (The Concept): Introduce the core principle in forty to fifty words with a clean definition on screen.
- Scene B (The Everyday Analogy): Explain how the principle works using a familiar everyday comparison so the idea clicks intuitively.
- Scene C (The Practical Application): Give the learner one specific action, reflection prompt, or worksheet step they can try in the next ten minutes.
3. Keep on-screen text brief while narration carries the nuance
One of the fastest ways to tire out a viewer is putting full paragraphs of lecture notes on screen while reading those exact same words aloud. People read faster than you speak, which creates cognitive friction when slide text and voiceover compete for attention.
Keep the visual text on each lecture scene down to a clear headline and three short phrases of four to six words each. Put your rich storytelling, examples, and nuance into the spoken narration script so the visual card acts as a clean roadmap rather than a wall of text.
4. Close every video with a two-minute practice prompt
Learning sticks when viewers shift from watching to doing. Dedicate the final twenty seconds of every teaching video to a simple, self-contained exercise. Ask the student to pause the video, write down three observations in their workbook, or test the technique on a current project before clicking play on the next lesson.

Closing each lecture video with a concrete reflection prompt helps self-paced learners apply new ideas immediately.
Building a course library that grows with your teaching
The biggest advantage of building teaching videos from structured scene scripts is how easily your course library evolves over time.
When student questions in your community forum reveal that a specific concept in Lesson 3 needs a clearer example, you do not have to dread re-filming the course. You simply open Lesson 3, refine the script on that single scene, and publish an updated video the same afternoon.
Learn about Moments of Joy, a five‑lesson journey to uncover the quiet, steady happiness that’s already within you. No big leaps required, just simple steps.
👉 Discover the Journey to Daily Happiness!
While guest articles offer varied perspectives, our core work focuses on helping you build genuine inner strength, mental focus, and self-mastery from the inside out.
👉 Explore Our Practical Courses for Inner Transformation